Product photography has become so important in the last decade. It is hard to imagine a website without any images, especially if you are selling online. Sure when selling customized items it is a little difficult but there is always
Sketchup and other free software to create some basic drawings.
In most cases, manufacturers will supply generic white background product shots that are good enough for most web pages. I use them myself in our businesses, but, whenever I can, I try replace them with my own product shots. When competition is tough, you have to stand out above the rest. You have to differentiate your product from the others even though it is the same. I think it is a psychological thing with buyers. Although the same product, if the image is different, it just "feels" different. That is when you have the edge. I am not talking about commodities such as an iPad, iPhone etc. They are too well known products and actually you don't even need an image to buy one.
You need a camera
So the question stands; what do you need for good product shots for a small upcoming business or website. Funny enough you actually don't need much. You just need an above average cell phone. seriously, LG, Samsung, Blackberry or iPhone (including iPad's). They are good enough for basic product shots.
For web images you really don't need the state of the art digital camera. Anything over 6MP is actually an overkill. I have taken stock images with a 2004 Nikon D70 and people are still buying those images. That is because images on the web must be small. My iPhone 6s makes 3024 x 2240 px images, each about 1.8 MB. For web applications that is massive. You need at most ±750 x 500 px. Try and reduce the file size below 100 kb. Anything larger and customers will get annoyed at the download speed. Further more Google and other search engines will penalize you for slow download speeds.
Ok so lets start of with some basics!
You need some type of background
The most popular background is white. You can achieve this by either placing white background under the product such as linen, velvet cloth or polystyrene boards. If you do have a shiny or reflective product, polystyrene boards can be a problem since it is not smooth and the 'bubbles' will reflect in your product. White velvet or PVC board is one of the best methods to use. They are cheap, and that is important for us.
You need light for product shots
Yeah, didn't think i would touch this subject did you. I mean, you have a flash, ok? Well for product photography you do not want to use flash if you don't have more than 2 off camera strobes (strobe is a fancy word for a strong flash). Never use direct sunlight, EVER. The sun is the worst sources of light you can ever have. You need soft light coming from all directions. So the best light is actually close to a window with white thin curtains in front. Ideally the sun must hit the curtain and create soft dispersed light.
Now place a table in front of the curtain and you have stunning light for any product shot.
Below is a shot taken with an iPhone very early in the morning on our porch. The background was a piece of white PVC board 500 x 500 mm. I really did nothing special, no editing with Photoshop nothing. For a basic product shot this is OK and one can improve. But anyone with a cell phone can take this type of image.
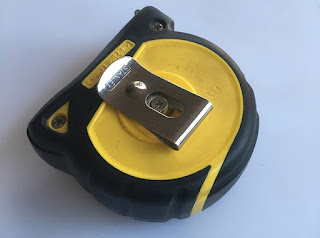 |
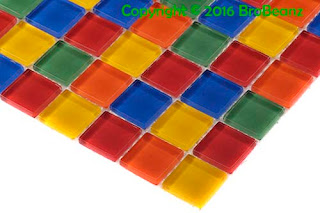
| This measuring tape or product shot was taken with an iPhone 6s, cropped and reduced the file size. The image can vastly me improved by editing it in Photoshop or capturing it later in the day when the colour of light is not so blue. This was taken early in the morning in low light conditions. |
 |
| As you can see, no studio needed for basic product photography. This was taken early in the morning so the light was limited and not very good. |
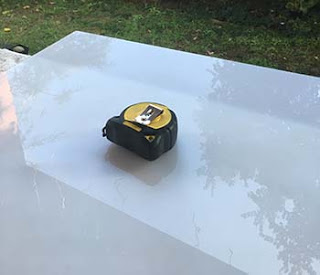
I repeated the same product, my little measuring tap, but this time I took the image later in the afternoon at 15:00. One can see the blue cast is gone the image as a whole looks warmer. I have not edited the image at all. The final image was edited in Photoshop. This was all done in a little make shift studio with plolystyrene sheets reflecting the sun creating a soft light. Off course I can do better, but I want to show you how little one needs for web product shots.
 |
| Product shot taken later in the afternoon on the same cellphone but with a slightly different setup |
 |
| The image after editing in Photoshop |
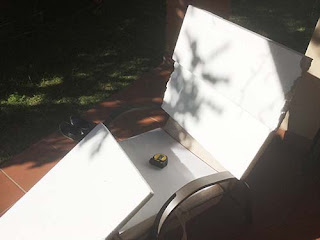 |
| My super simple studio just to prove a point. You don't need expensive gear to make basic product photo's for your business |
Using two flashes at once
Using a more advanced digital camera you can use off-camera flash. This is a little more advanced and entry level cameras don't always support this type of photography. You can however install non-brand name flash triggers but then you have to set the aperture and flash output manually. A system I converted to is the Cactus off flash trigger and two flashes. With my old Nikon system I used an SU-800 with two SB800 flashes. Although they have the option of iTTL (Which is a creative way of saying auto-flash), I always used manual settings which provides you with the most consistent results.
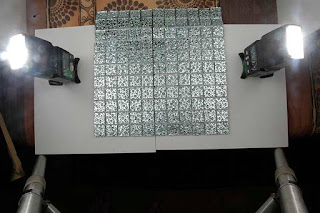 |
| Off camera flash. Your camera or system must be able to trigger the two flashes remotely. There are various brands that can achieve this on most cameras. |
 |
| This image was created using two remote strobes with a Nikon D70 and SU-800. The two Nikon SB800's were bounced of a large white polystyrene card just above the mosaic. The background was polystyrene but was cut out with Photoshop. |
Some remote brand triggers that can be used with any camera are:
- Phottix - Very professional system but a bit pricey for me.
- Cactus - Very well priced, good quality (The system I am currently using)
- Hahnel -
- PocketWizard - just very expensive
- Profoto
- Yongnuo - Fantastic little triggers and very cheap. Designed to work mostly with Nikon and Cannon.
I am not recommending a single system. If you are planning to go this route you will have to do your homework very well. Don't just think of price and quality. Consider the fact that you might want to expand as well.
Small tips to increase the quality of you product images
Location, location, location
Try various places in the house or even on covered porches. Be careful not to wonder outside as the blue sky can create a cold blue cast on your product, especially if it is light in colour. Try use a room that has white walls and light brown or white curtains. Be careful using a room with coloured walls, they will cause colour casts or shifts in your images. Editing out colour casts can be tedious work, and you need the right software for it.
The better your setup
The whole idea is to create the perfect colour environment during the shot so there is as little digital work to do later on. Digital alternations are time consuming and a waste of your time. Get the colour balance of the light right the first time.
 |
| You don't need a studio for product photography, a small table with soft light and nice background is more than adequate. |
Product backgrounds
Use a simple background that suits your website style. White is very difficult to get and as you can see in the above images it is actually grey. Even professional photographers cannot get a perfect white background and that has nothing to do with technique, it is all about the limitation of the current sensors we are using. Just take a look at some stock images with white backgrounds, some are grey. You can reduce the grey by increasing the exposure on the camera or in some photo editing software. Remember, the colour balance and look of the product is the most important, not the background.
 |
| Wood has become very popular these days and it provides character and mood to your products. At least there is not as much work as with white backgrounds that almost always need some form of editing. |
Lifestyle images work best
Lifestyle shots are the most valuable. They mean much more than a single product shot on a white background. Have a look at some watch manufacturers, they try and take images of the watch on the person as well as the watch alone. Clothing is another example. If you are selling taps (faucets) for instance, show it alone yes, but an installed tap on various basins just means much more for the person viewing it.
Better equipment
Use a better 'image capturing device'. Upgrade to a digicam but don't go and spend a fortune please. Do not fall into the 'Gear Acquisition Syndrome' (GAS) that 99% of professional and amateur photographers get trapped into by big corporation marketing. The most important component of your camera is the the light you have available. The second most important is the lens you are using and the third is your creative mind.
Just a few polystyrene boards and an extra helping hand can make your images so much better without forking out half of your precious cash flow.
Software to edit your images
I don't want to delve too deep into the software available but there are a lot of free software packages that allow for basic editing of images. The best known is Photoshop (which I am currently using) but open source programs like Gimp are just as good if you want to do basic stuff. Microsoft Picture Editor is also good and the old trustworthy Paint has helped me a lot, as a matter of fact I use it a lot to copy and paste and convert images quickly.


Comments
Post a Comment